On Seeds & Schedules
March 4, 2009 at 2:45 pm Jennie 6 comments

It’s early March. Do you know where your seeds are? Mine have been arriving in spurts as each different supplier gets them shipped to me. My two favorite sources for seeds are Renee’s Garden Seeds and Johnny’s Selected Seeds. I think I should be ashamed to admit to you that I’ve got more than 35 packets of seeds in my storage box and more on the way, but I’m rather addicted to seed starting. If you’ve ever started your own seeds, you’ve probably gotten hooked too.
With a small bench in a greenhouse currently at my disposal, getting seeds started is easier than ever. Three weeks ago I started my ‘Frontier’ onions, and they’ve done a tremendous job popping their long skinny necks up out of the flats. When I start seeds, I fill my packs or flats with a very loose germination mix and soak it thoroughly with a gentle mist from the hose before sowing the seeds. By soaking the soil/media first, the seeds don’t get clumped into groups by water droplets from overhead watering, and they start off with a wealth of moisture to get them happy and growing.

My seeds tend to germinate much more quickly than the seed packet says thanks to a rather homemade system for keeping them in a perfect little pocket of moisture and warmth. I use one of those flimsy flats that hold pots at the commercial greenhouse and invert it over the tray holding my seeds. Then I cover the whole thing in clear plastic, sealing in and protecting the little seeds against drying out or getting hit by any chilly drafts. The need to water them is cut in half, which is hugely helpful considering seeds need fairly constant and even moisture to germinate. If you’re going to give this system a shot, just be sure to use the kind of flats that have big openings in them so that plenty of light can still get through to your seedlings when they start popping up their heads.
I typically leave this little incubator system in place for about a week after the first signs of germination since the seeds have headroom thanks to the inverted flat keeping the plastic off of them. After that first week’s growth though, I take the plastic and inverted flat off the seed tray to let the seedlings have the maximum amount of light possible as they get their photosynthetic wheels turning.
As I mentioned in the post about my garden layout for the coming season, I have a lot of crops I want to grow and the vast majority of them are being started from seed. Seed starting is not a once-and-done deal; each crop requires a different timeline, both in sowing and in transplanting. Adding to the challenge is the fact that I want to do succession plantings in my garden this year, both in the form of multiple sowings of a particular crop (i.e., string beans) and of switching out a spring harvested crop for a summer or fall harvested crop (i.e., sugar snap peas and summer squash).
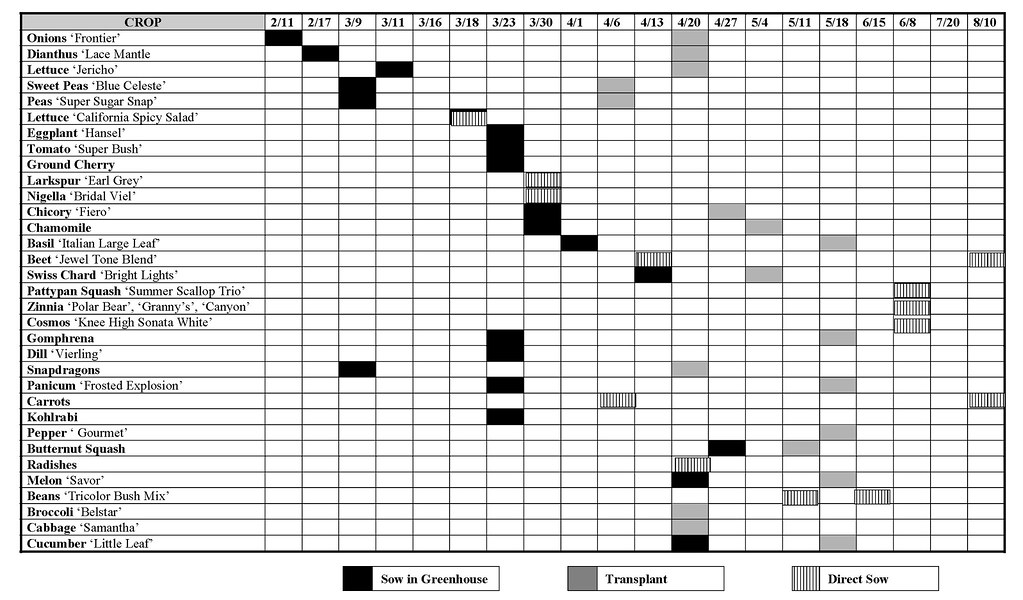
To accomplish this intricate dance of the seeds, I’ve created several spreadsheets, have a calendar I write notes on, and have organized my seeds in a box by sowing month. Keeping the whole ball of yarn from unraveling is a very basic schedule (pictured here) that says when I’m supposed to sow the seed and when it gets transplanted into the garden. By planning in so much detail and so far in advance, I’m pretty confident that healthy plants will get into the ground where and when they need to and hopefully it’ll be a very productive year as a result. I’m already planning loads of recipes for the French melons, pattypan squash and ground cherries (as well as all the rest)!
Oh, and yes, I realize this is a food blog…or at least it used to be. If you are not a gardener (in spirit or in act) and you are getting fed up with all this crazy plant talk, I apologize. Please bear with me as I sooth my cabin fever with thoughts of spring. I promise there are new recipes coming soon! How does Celeriac & Ginger Soup sound for starters? Stay tuned!!
Entry filed under: In The Garden. Tags: gardening.
6 Comments Add your own
Leave a comment
Trackback this post | Subscribe to the comments via RSS Feed


1. Jason | March 4, 2009 at 3:52 pm
I hadn’t thought of creating a spreadsheet like the one you’ve created. I think that shows SO MUCH MORE than just a calendar can. I’m going to create one of those tonight!
I’m curious, from which source do you find the most reliable last frost date? Beyond that, do you BELIEVE your source, or do you typically give yourself an extra week just in case?
Last year, we ended up starting our seeds way too early because I overestimated the time it would take for germination and I underestimated the likelihood that winter would stay longer than predicted.
I’m planning to start two weeks later than last year, just as a precaution.
2. Jennie | March 4, 2009 at 5:15 pm
Jason – Yes, the spreadsheet really helps me keep on task with getting seeds sown and then getting them transplanted before they get too leggy and nutrient deficient in the pots/trays. You’ve unwittingly amused me though with your question about an accurate frost date. I smiled because it’s really just an intuition garnered from years of growing my own stuff. That being said, your state’s university system (state schools) should have what’s called an extension office where they will be able to give you the most accurate scientific date for the last frost in your area. Sowing your seeds a little later is definitely a wise bet for playing it safe. If you’re like me though, getting stuff planted is nearly an obsession, in which case you’d be wise to find yourself some light-weight row cover fabric (http://www.gardeners.com/Garden-Fabric/5111,default,pg.html) that you can stretch over your pots so that a late frost really becomes much less of a threat. Your young plants will still get plenty of sunlight, but they’ll be able to retain enough warmth under their “blanket” to ward off any frost damage. Also, I buy a little insurance by over-planting my seeds so I have some extra transplants I hold back inside in case everything out in my garden meets with disaster the first few weeks.
3. Jason | March 5, 2009 at 10:01 am
I hadn’t thought about the row cover fabric. That sounds like a great idea — especially since the lake breezes, here, really shock our transplants even with several days of hardening off.
I was, last year, under the impression that the Old Farmer’s Almanac was something next to divinely-inspired prophecy, but have since decided it’s more for entertainment purposes than necessarily PLANNING purposes! Many gardeners here in the Chicago area choose to wait until closer to Memorial Day even though the OFA gives the ok to plant on April 22, this year.
Like you, I think I’ll give myself an extra week for padding (maybe two) and I’m also planning to grow extra seedings and stagger my transplanting for insurance as well.
4. Sylvie, Rappahannock Cook & Kitchen Gardener | March 5, 2009 at 6:14 pm
I love to see what other dedicated gardeners are doing. I also keep tracks of my planting, germination, yield & through spreadsheet and have developed planting calendars too! I used to want to do it by hand, but the flexibility of the spreadsheet is wonderful (and for me easier to keep up with)
And I love your little incubators! those plastic domes are not cheap, so recycling clear plastic bags is wonderful
I discovered your blog earlier this year, and I have been enjoying reading what you are doing – and how.
5. Melly | March 14, 2009 at 3:06 pm
Could I do the germinating on my patio? I live in Sacramento, CA and the temp is about 40 at night but is now getting up to 65 or 70 during the day. I love the plastic and the tray idea.
I’ve decided to dig up half of my yard for a garden this year!
6. Jennie | March 15, 2009 at 10:46 am
Melly – It’s probably best to still germinate your seeds inside near a heat source. Seeds like constant temps of around 70 F while they’re working their way out of their blanket of soil. Once you have them poking sturdy leaves out for a week or so, you could probably put them on the patio protected with the plastic/tray set-up. I’m excited to hear you’re planting a garden this year! Feel free to ask any questions that you may have. I also have a gardening blog you can visit: Straight from the Garden. 🙂